ENC4265
| Home | Manual Assessment Memo | Chatbot | Procedure Video | Manual | My Blog |
Procreate User Manual
Welcome to your comprehensive guide for mastering digital art on Procreate for iPad.
Procreate is a powerful tool that provides studio-quality resources at your fingertips, all for a one-time purchase. Whether you are new to digital drawing or new to Procreate itself, this manual offers step-by-step instructions and explanations for the wide array of tools that Procreate offers.
Table of Contents
- Getting Started
- Understanding the Gallery
- Understanding the Workspace
- Brushes & Tools
- Layers & Masks
- Colors & Palettes
- Transform & Adjustments
- Selection & Actions
- Touch Gestures and Shortcuts
- Exporting & Sharing Artwork
- AI Statement
- References
Getting Started
Tools
- iPad (Procreate is an iPad exclusive)
- Apple Pencil (recommended, works like a normal pencil and makes drawing more comfortable)
Purchase and download Procreate from the App Store on your iPad.
Understanding the Gallery
The Gallery is the main page of Procreate. Here, you can create new projects, preview existing projects, import photos and files, and organize your projects. The following will explain how to utilize the Gallery.
Create a Canvas
- Tap the ‘+’ icon at the top of the Gallery to create a new canvas.
- Select a canvas from the list to create a new project.
 Figure A: Canvas creation
Default Canvas Templates
In the New canvas menu, procreate offers a variety of default canvas templates to choose from depending on your needs. Below is an image of the default canvases available.
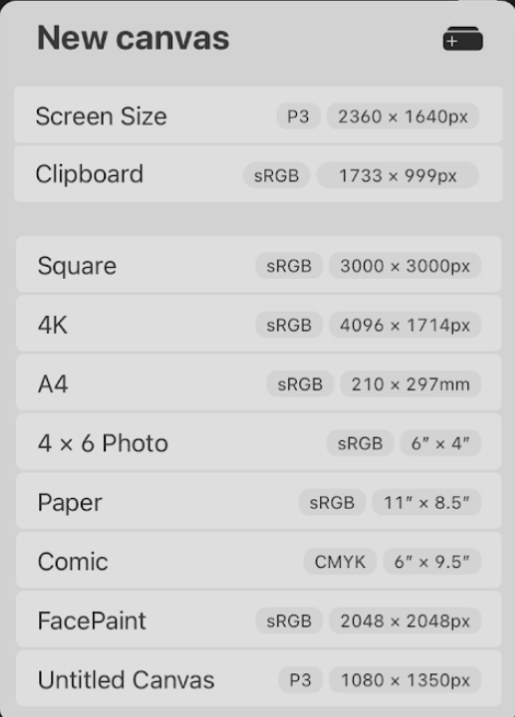
Figure B: Canvas templates
Edit or Delete Templates
Procreate offers the ability to edit or delete existing templates:
- Swipe left on an existing template to reveal the options menu.
- To edit, tap ‘Edit’ to view the Custom Canvas options.
- To delete, tap ‘Delete’.
Create a Custom Canvas
Creating a custom canvas allows you to edit and customize each aspect of the canvas. To create a custom canvas:
- Tap the ‘+’ icon at the top of the Gallery.
- Tap the canvas icon with a ‘+’ to the right of ‘New canvas’.
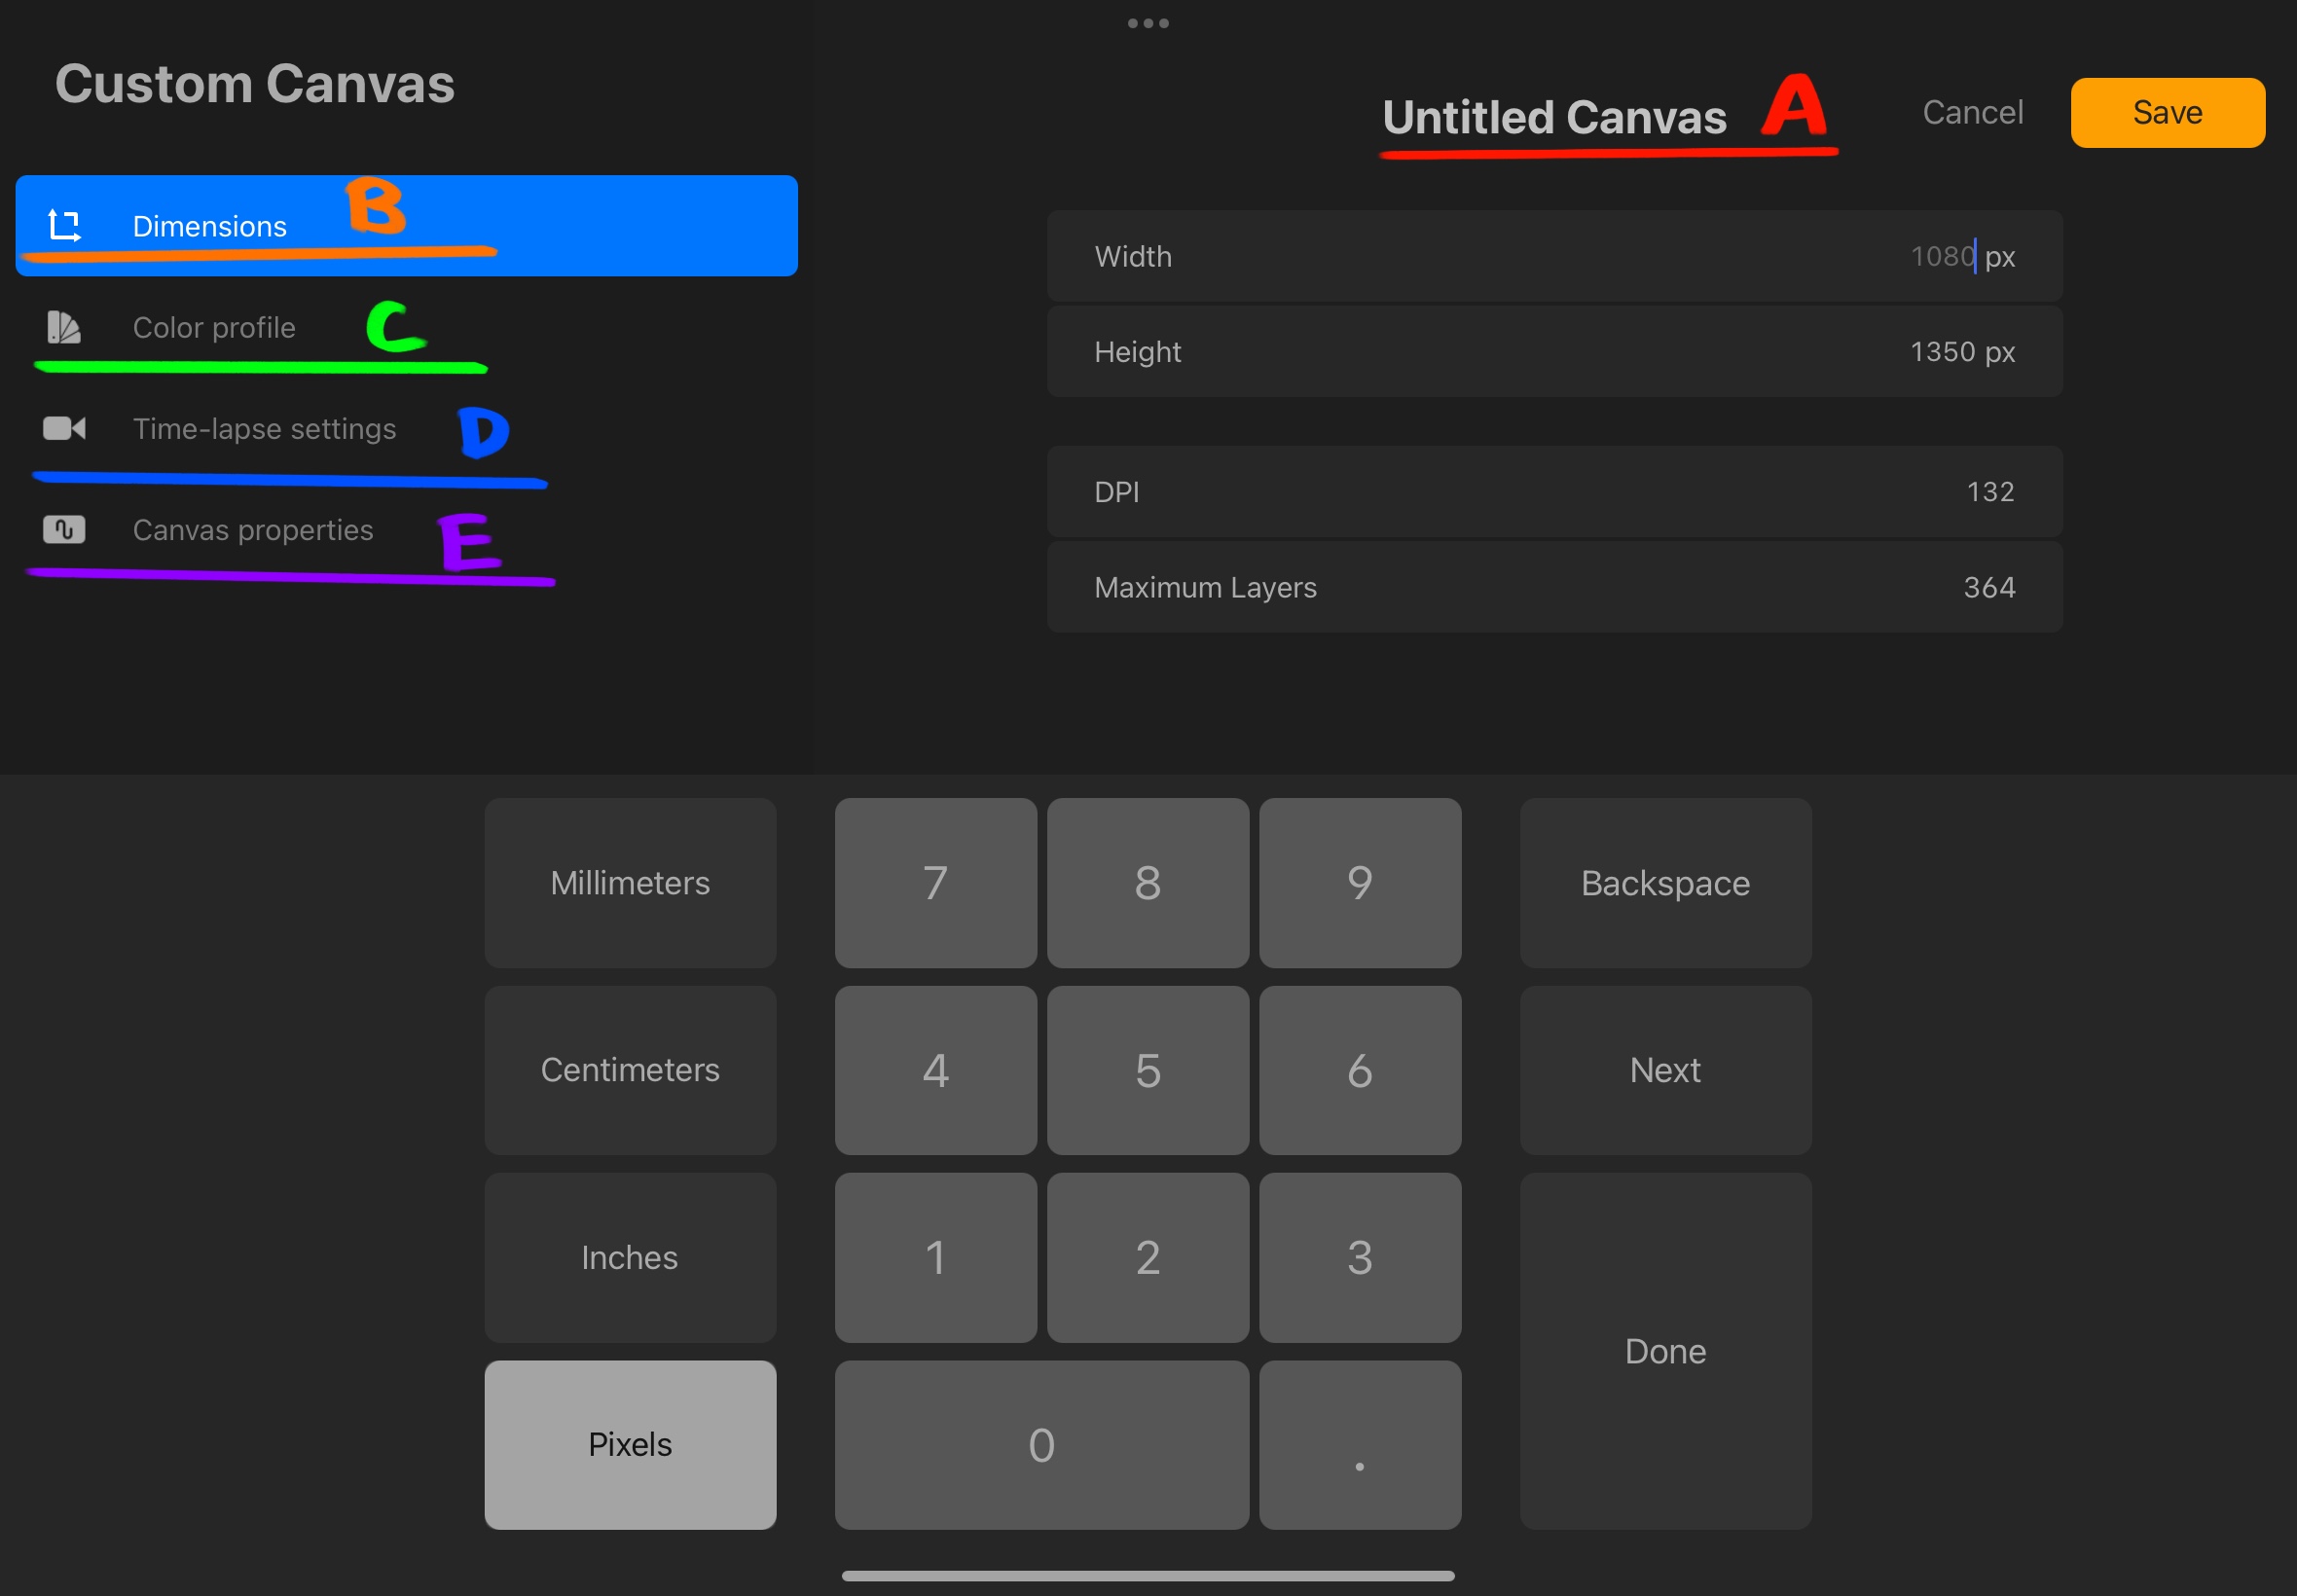 Figure C: Custom Canvas Menu labeled
This opens the Custom Canvas settings menu shown in Figure C
The following is an explanation of each tab:
(A) Canvas Name - Tap to change the name of the canvas.
(B) Dimensions - Here you can change the width, height, and DPI of the canvas. (Note: the higher the resolution, the lower the maximum layers allowed)
(C) Color profile - Your project’s colors will look different on different screens and media. Here, you can change the color profile to best fit your needs.
(D) Time-lapse settings - These are the settings for the exported time-lapse of this project. Here, you can change the resolution, compression, and file type.
(E) Canvas properties - Here, you can edit the default background color of the canvas or hide the background.
- Click ‘Save’ at the top right to save your changes.
Preview
Procreate allows you to preview your existing artworks in the Gallery.
There are two ways to preview your artwork:
- Pinch to zoom in on an artwork
- Tap ‘Select’, check the circles for the artworks you’d like to view, then tap ‘Preview’.
Photo
To import a photo:
- Tap ‘Photo’ at the top right of the Gallery. This will open your photo gallery.
- Select the image to import.
The photo will be added to the Gallery and open the workspace for editing.
Import
To import files:
- Tap ‘Import” at the top right of the Gallery. This will open your files on iPad.
- Select the file to import.
The file will be imported to the Gallery and open the workspace for editing.
Organization
The Gallery is able to be rearranged, and projects are able to be stacked. You may also share, duplicate, and delete projects from the Gallery.
Rearrange
To reorder projects in the Gallery:
- Tap and hold the project you’d like to move.
- While still holding, drag the project to where you’d like to rearrange it, and release.
Stack
To stack projects together:
- Tap and hold a project.
- Drag the project onto another project and release.
OR:
- Tap ‘Select’ at the top of the Gallery.
- Select the projects to form the stack. (Must be 2 or more projects)
- Tap ‘Stack’.
 Figure D: Stack creation example
This will create a folder, or “Stack” full of projects. More projects can be added to an existing stack using the same methods.
Understanding the Workspace
Procreate’s Workspace is minimalistic and compact, allowing artists to focus on their project at hand.
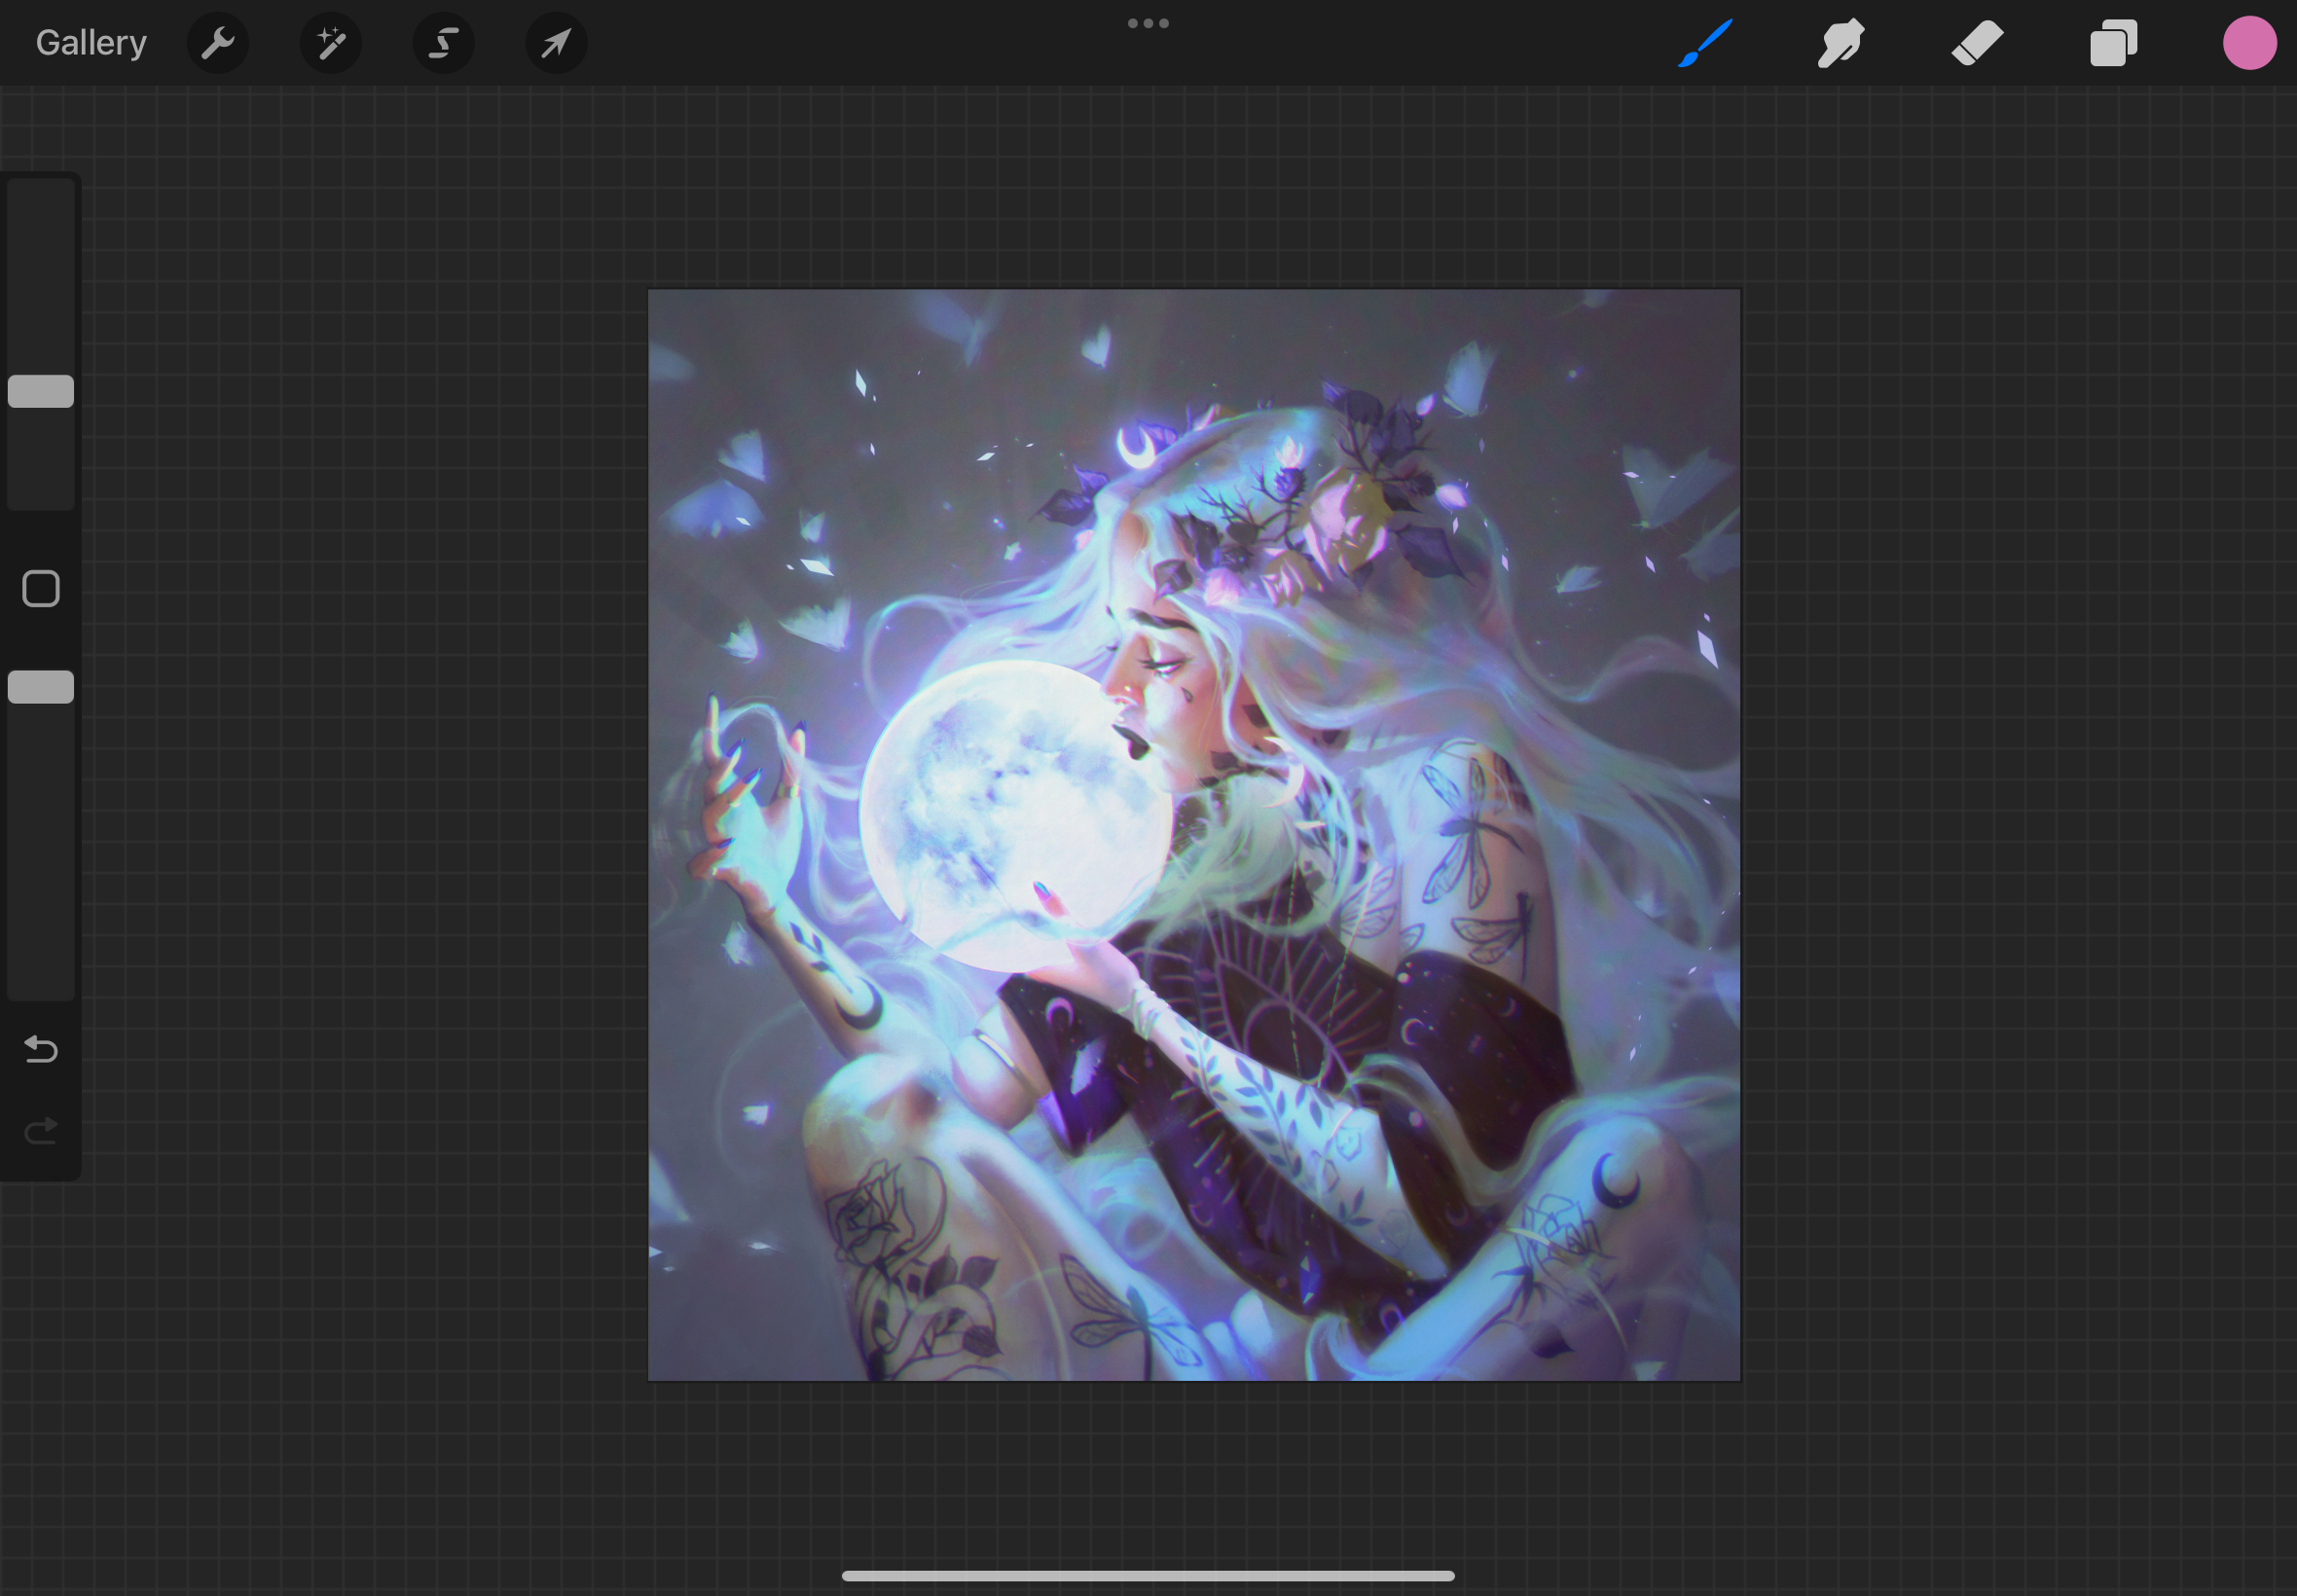 Figure E: Procreate workspace layout
Painting Tools
 Figure F: Painting tool bar
From left to right:
-
Brush Library: Swap between brushes. Here, you can import and edit custom brushes and organize the brush library.
-
Smudge Tool: Blend lines and colors with the smudge tool.
-
Eraser Tool: Erase mistakes with custom eraser brushes.
-
Layers: View, edit, and organize layers.
-
Colors: Select colors with the color wheel. Here, you can create or import color palettes.
Side Bar

Figure G: Side bar panel
From top to bottom:
-
Brush Size Slider: Drag the slider up to increase brush size, drag down to decrease.
-
Modify Button: Customizable button for tools. The default settings brings up the eyedropper.
-
Brush Opacity: Drag the slider up or down to increase or decrease brush opacity.
-
Undo Button: Undo recent actions.
-
Redo Button: Redo recent actions.
Editing Tools
 Figure H: Editing tool bar
From left to right:
-
Gallery: Tap to go back to the Gallery.
-
Actions: Opens the action menu where you can add files, adjust the canvas, share your project, and export time-lapse replay.
-
Adjustments: Opens the adjustments menu where you can adjust colors and visual effects.
-
Selections: Use the selection tool to isolate and select specific sections of your artwork.
-
Transform: Use the transform tool to resize and shape your layers or selection.
Brushes & Tools
Procreate offers an extensive collection of brushes, smudge tools, and erasers to bring impressive detail to your artworks.
Brush Library
Procreate comes equipped with an extensive default brush library, organized into categories such as Sketching, Inking, and Painting. Each category is tailored for specific needs.
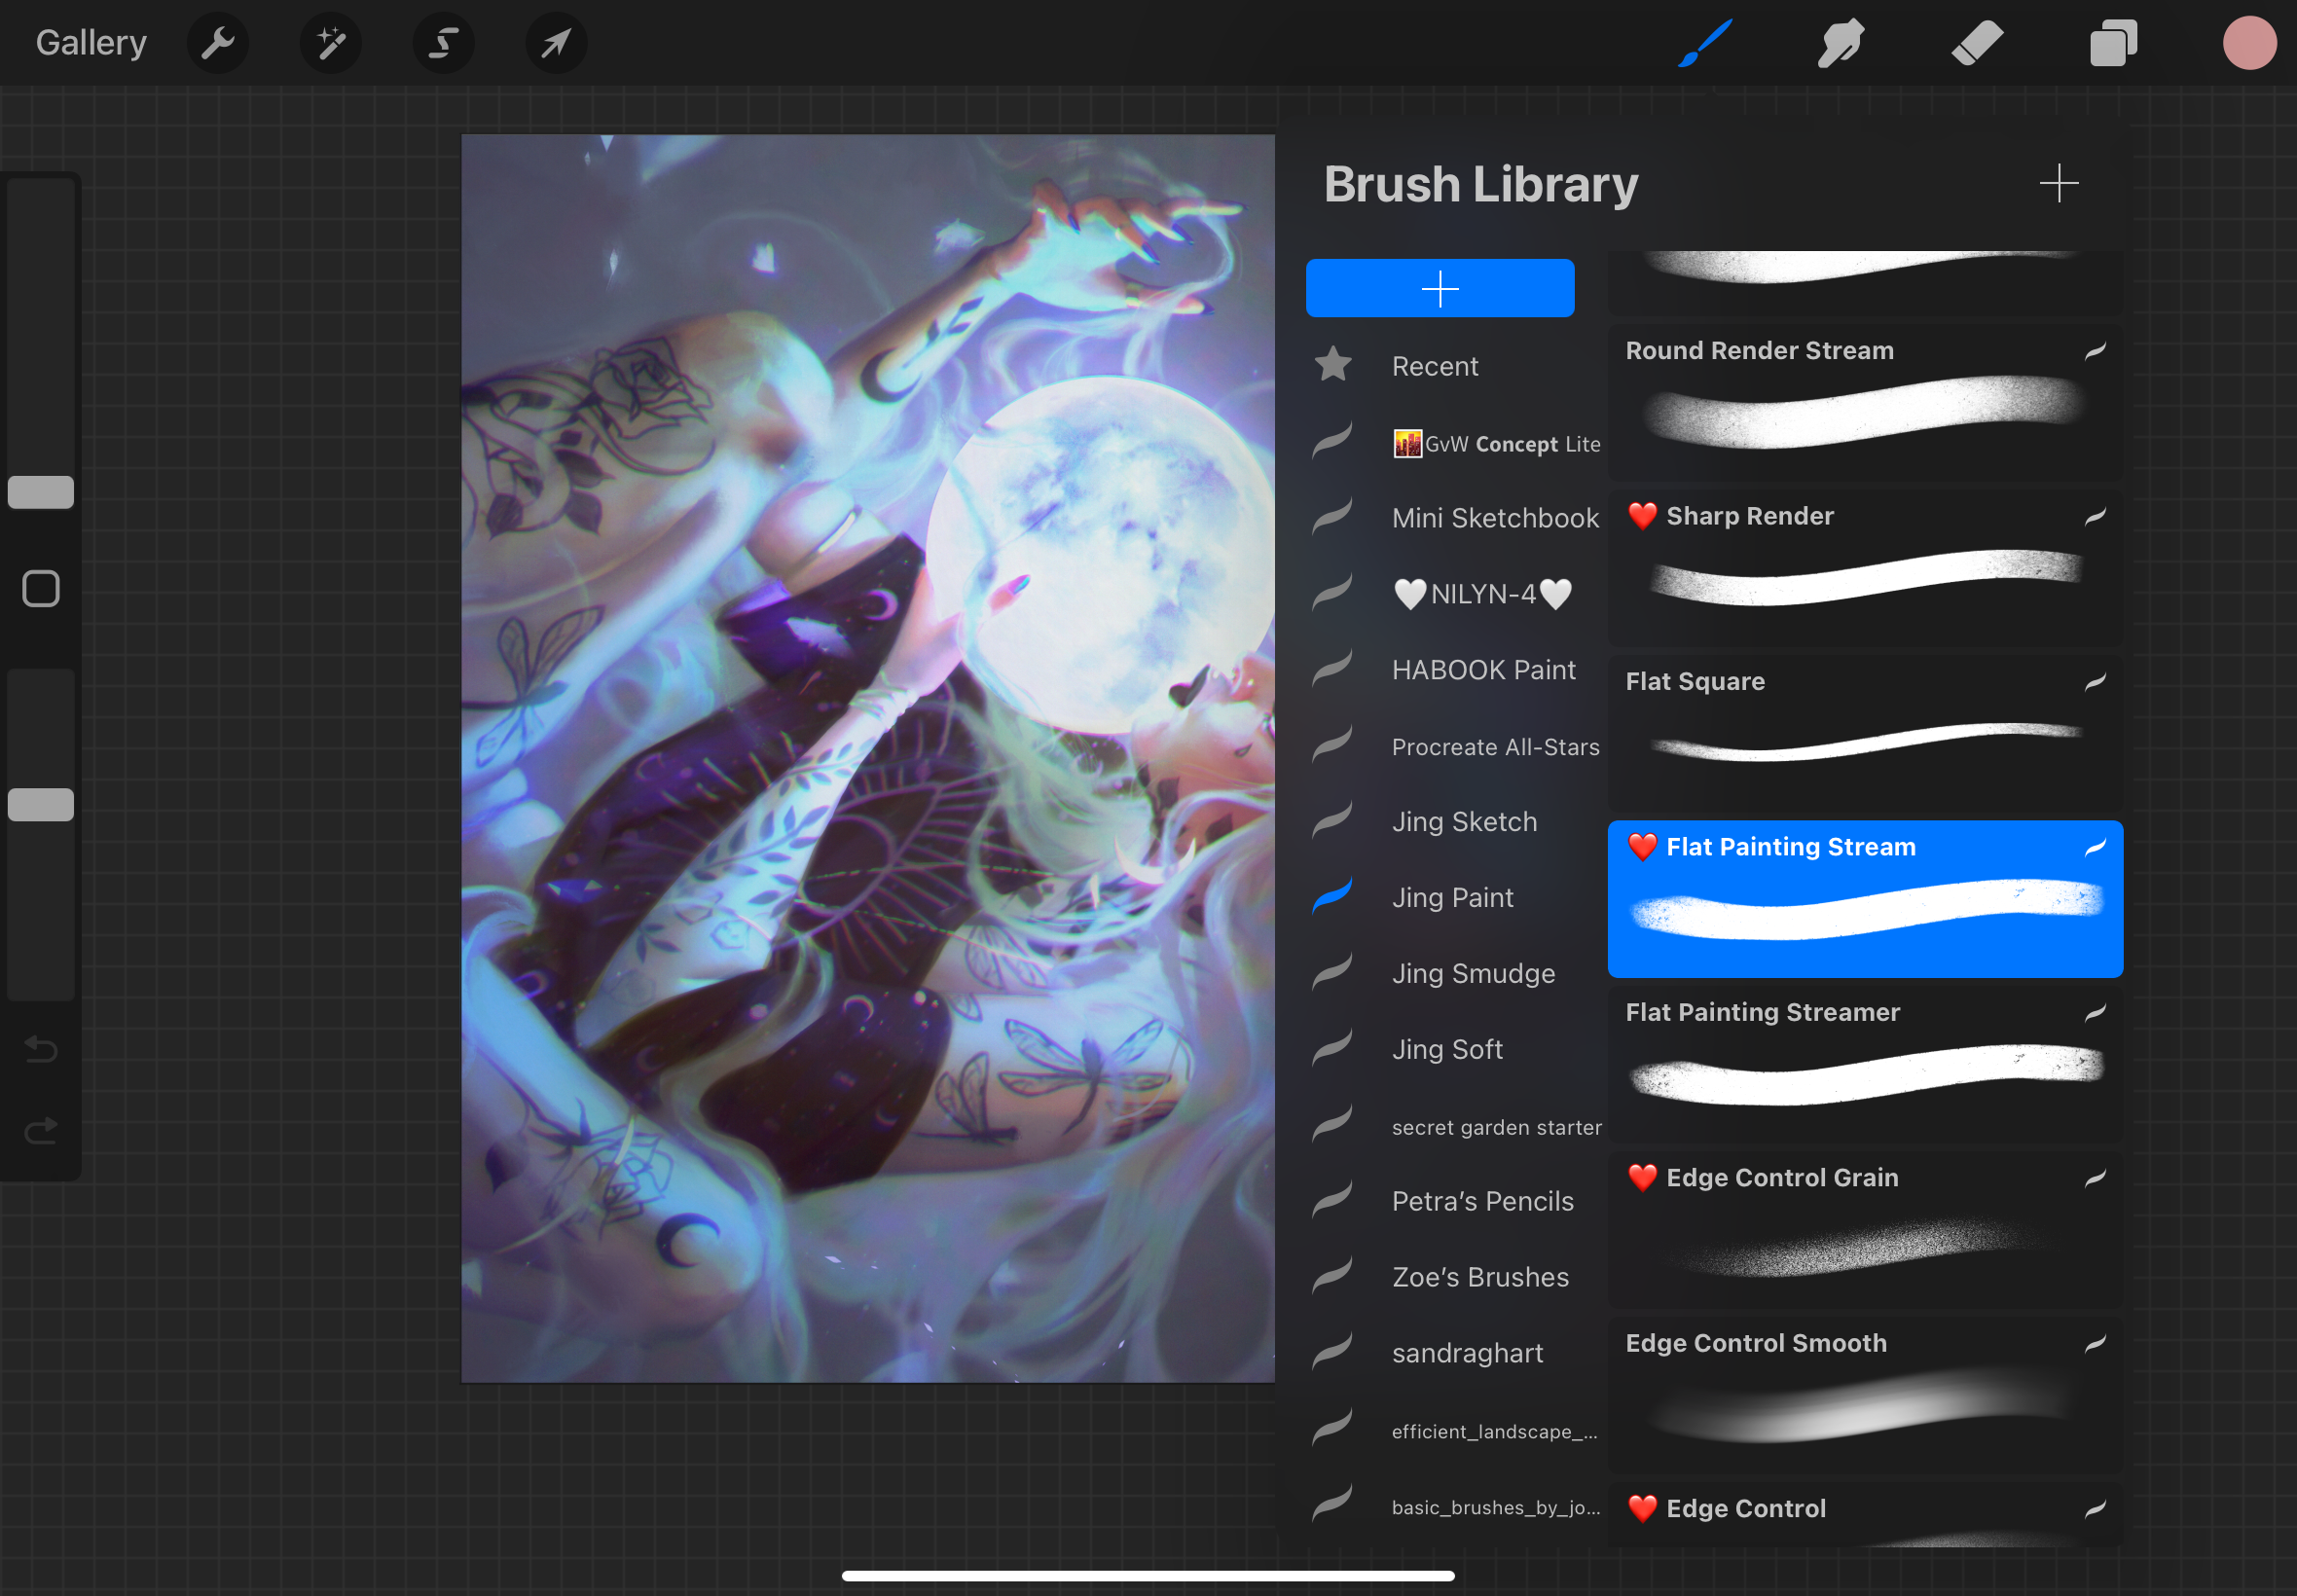 Figure I: Brush Library
- Sketching Brushes: Best suited brushes for rough sketches.
- Inking Brushes: Best suited for clean line art.
- Painting Brushes: Imitate real paintbrushes for the traditional painted look.
Customizing and Creating Brushes
Procreate allows artists to fully customize brushes in the Brush Library with Brush Studio:
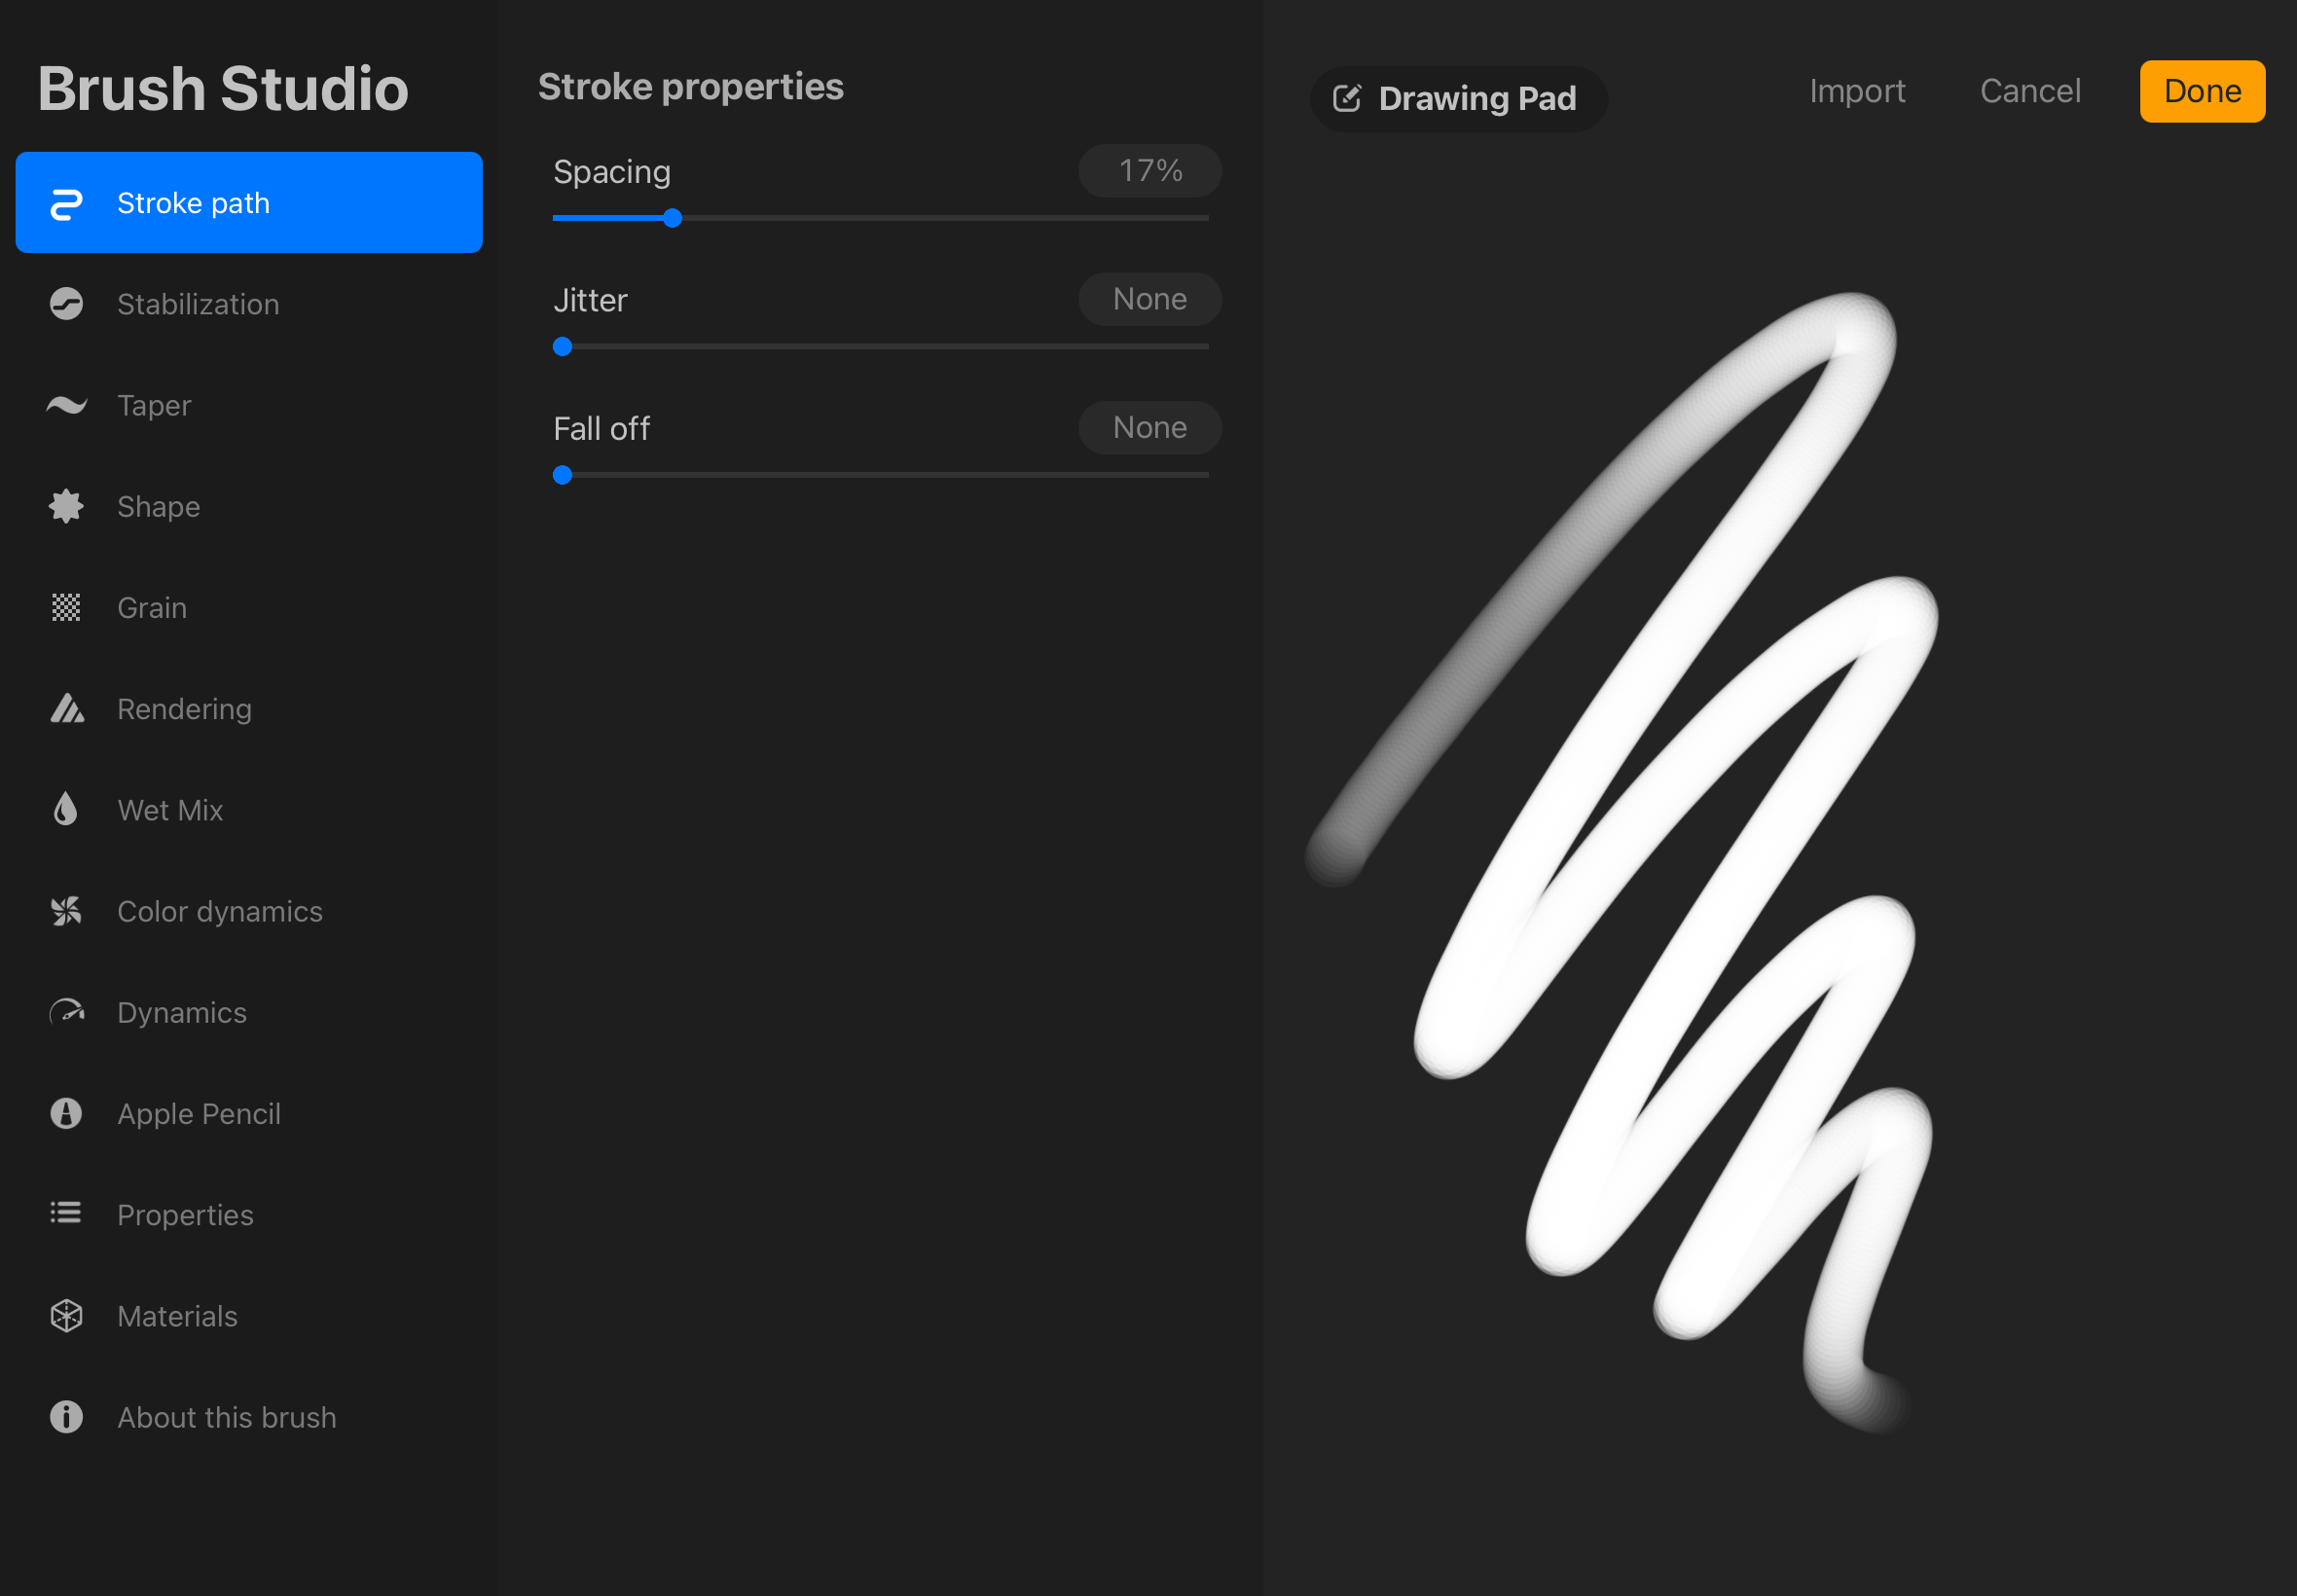 Figure J: Default Brush Studio
- Tap on a brush to open its settings.
- In the Brush Studio, you can adjust various settings such as stroke path, stabilization, taper, grain, and more.
- Adjust the brush settings to suit your unique art style.
Procreate also allows artists to create brushes from scratch:
- Tap the ‘+’ icon at the top-right corner of the Brush Library. This creates a nnew brush with default settings.
- Adjust the brush settings to your liking.
- Tap the category ‘About this brush’ to change the brush name.
- Tap ‘Done’ at the top-right to save your new brush.
Smudge and Erase
In addition to brushes, Procreate offers Smudge and Erase tools:
- Smudge Tool: Blend colors and create gradients. Select any brush from your Brush Library to control the smudge effects.
- Erase Tool: Erase or soften parts of your artwork. Select any brush to change the effect.
Importing and Exporting Brushes
Expand your Brush Library through importing external brushes and sharing your own:
-
Import Brushes: Tap the ‘+’ icon in the Brush Library menu and select ‘Import’ to import .brush or .brushset files to import single or sets of brushes.
-
Export Brushes: Swipe left on any brush and select ‘Share’ to export and share your brush file with others. To share a set of brushes, tap the brushset’s name in the Brush Library and select ‘Share’.
Layers & Masks
Creating and Managing Layers
Layers help you organize your artwork. Work independently on different elements of your work withing affecting other parts.
 Figure K: Layers Menu
Create a New Layer:
- Tap the ‘+’ icon in the Layers menu.
Reorder Layers:
- Drag the layer up or down.
Group Layers:
- Swipe right on multiple layers and tap ‘Group’. Alternatively, drag and drop one layer onto another to group.
Rename Layers:
- Tap on the layer and then tap ‘Rename’.
Blend Modes
Blend modes change how layers interact with each other.
Change Blend Mode:
- Tap the ‘N’ next to the layer in the Layers menu.
Procreate offers many blend modes such as darkening options, lightening options, multiply, and more. Experiment with blend modes to transform your artwork.
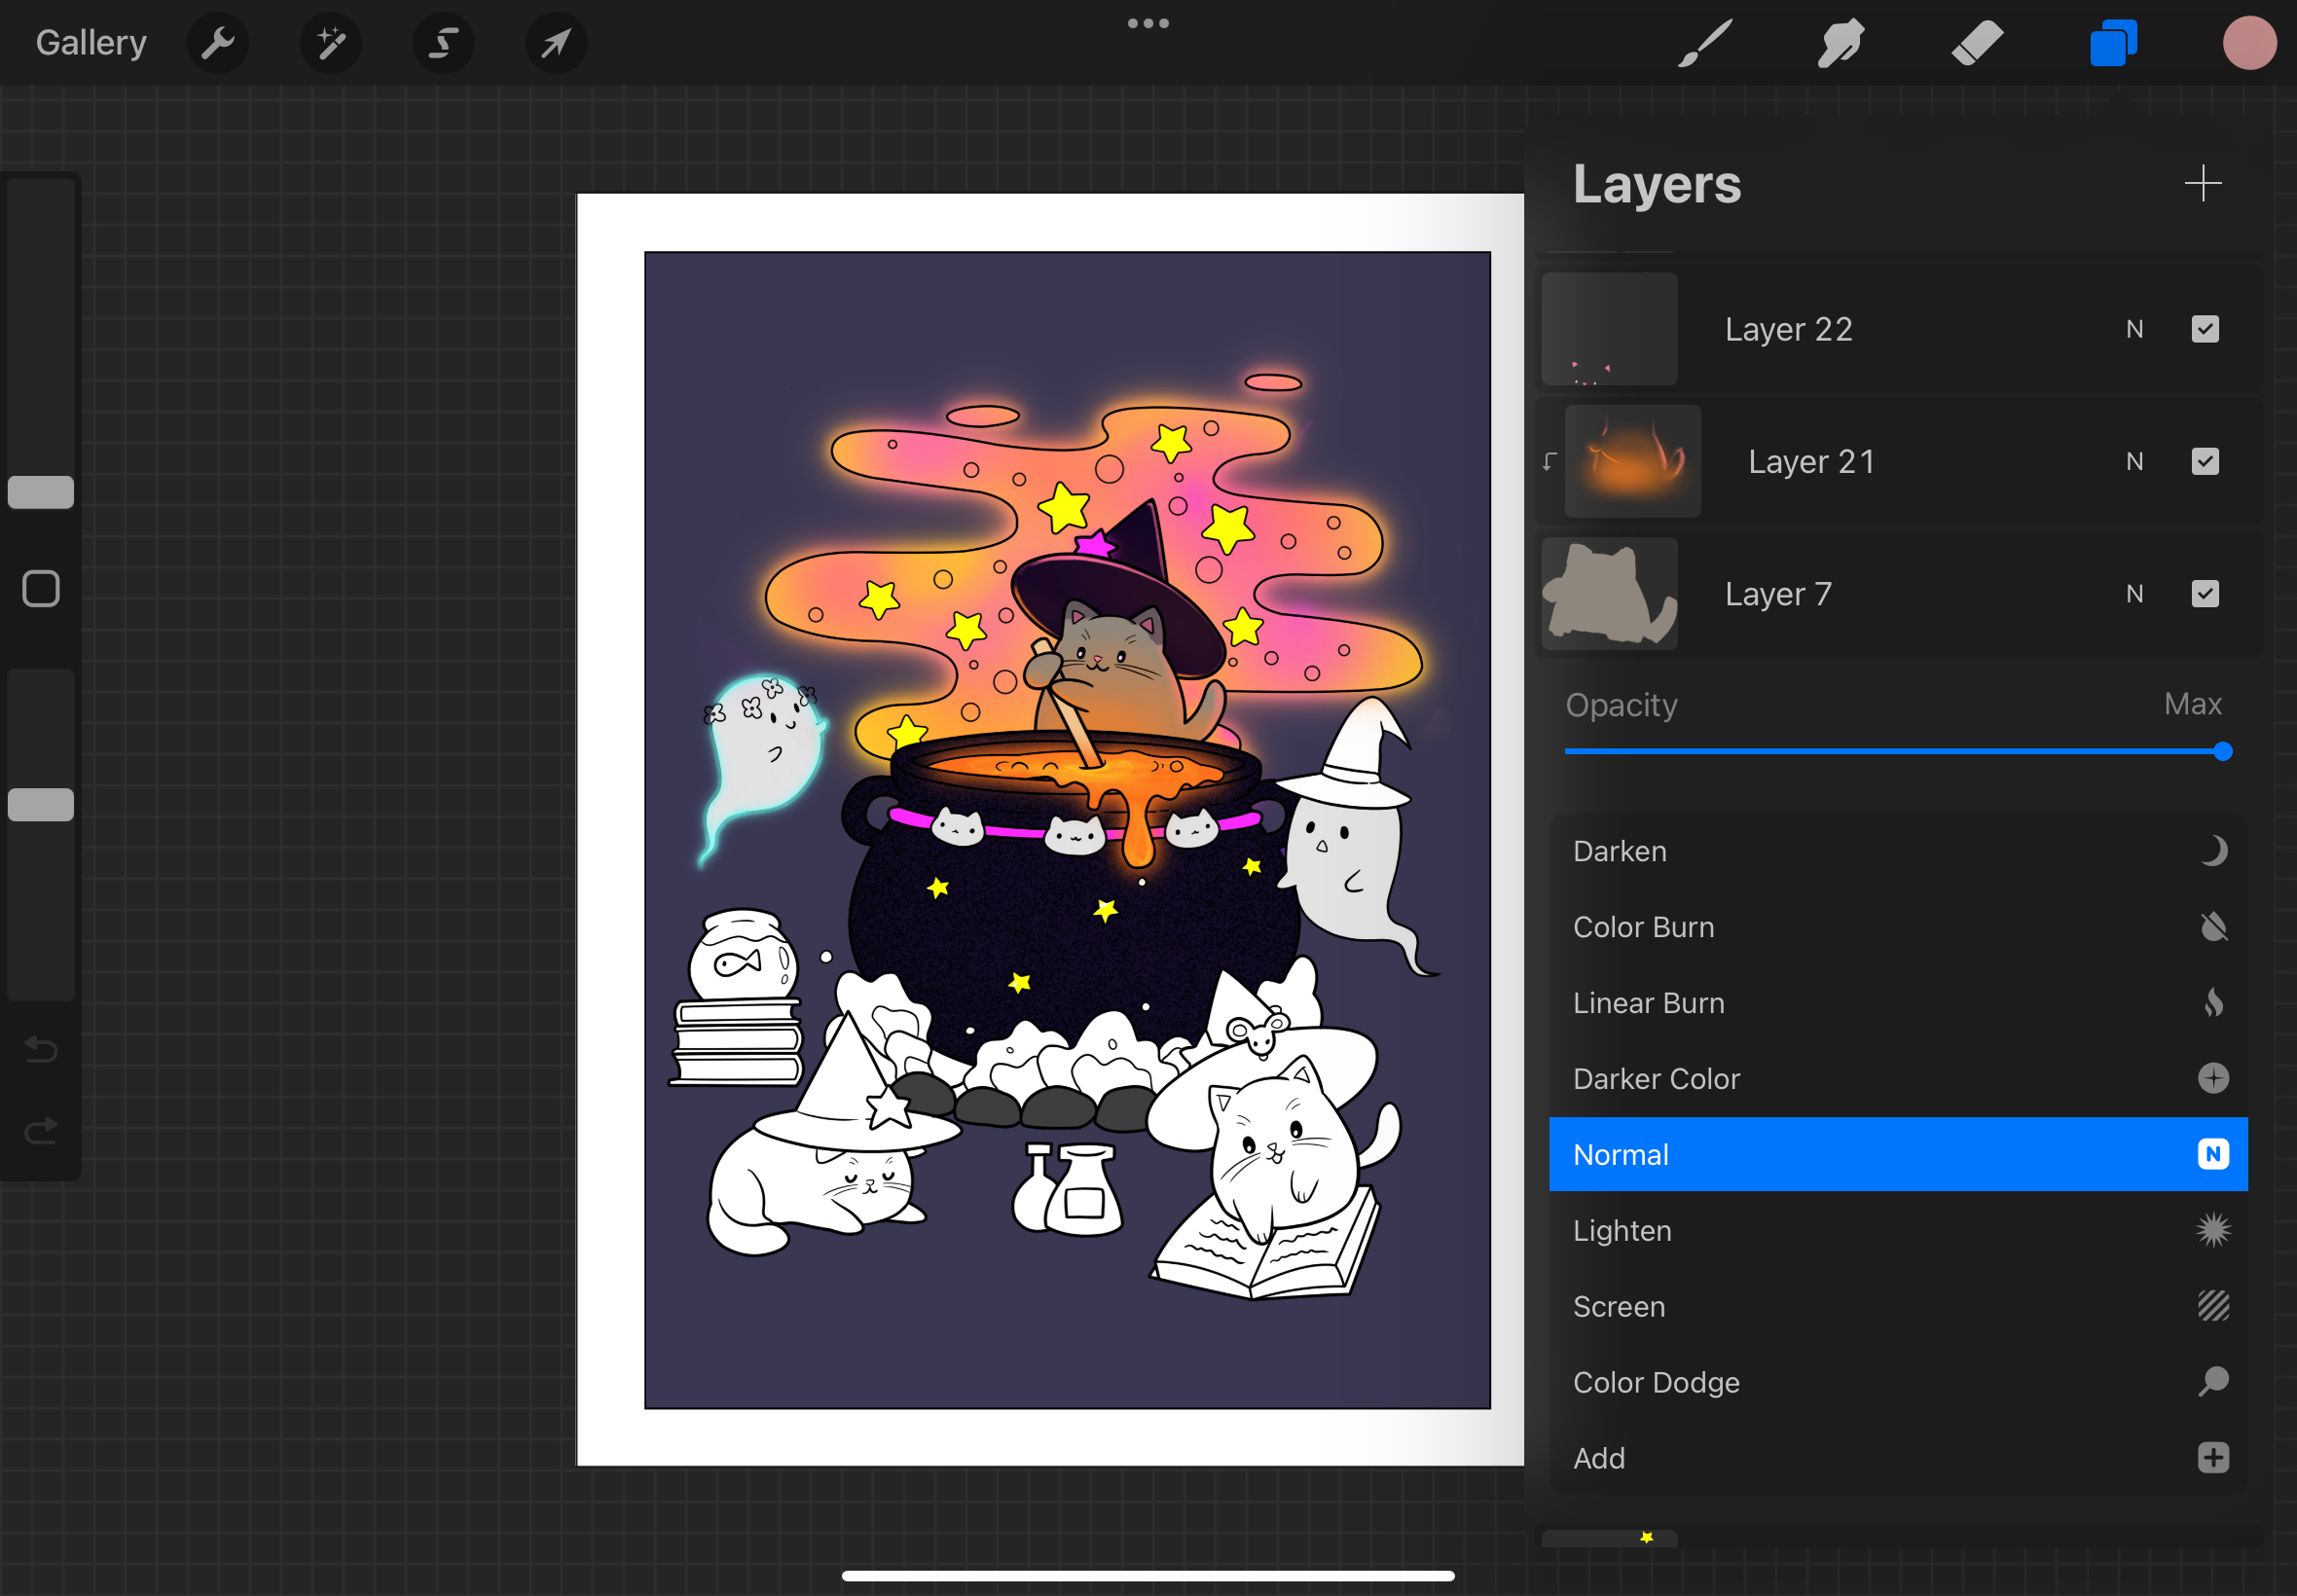 Figure L: Blend Modes
Alpha Lock and Clipping Masks
- Alpha Lock: Restricts painting to the existing pixels on a layer. Enable Alpha Lock by tapping on a layer and selecting ‘Alpha Lock’. Alpha Lock is useful for adjusting colors of a layer without changing the existing shape.
- Clipping Masks: Allows painting on a separate layer while restricting the painting to the pixels of the layer below it. Create a clipping mask by tapping the top layer and selecting ‘Clipping Mask’.
Layer Adjustments
Procreate offers layer adjustments such as opacity, visibility, merging, duplicating, deleting, locking.
Change Layer Opacity
- Tap the ‘N’ next to the layer and adjust the opacity slider.
Hide or Reveal Layers
- Toggle the checkmark next to the layer to show or hide its contents.
Merge Layers
- Pinch two layers together or select a layer and select ‘Merge’ Down to merge two layers.
Duplicate or Delete Layers
- Swipe left on a layer and select ‘Duplicate’ or ‘Delete’.
Lock Layers
- Swipe left on a layer and select ‘Lock’ to lock it. Locking the layer prevents any further changes on this layer. Select ‘Unlock’ to unlock a layer.
Layers allow easy and specific adjustments to parts of your work without affecting other layers.
Colors & Palettes
Color Wheel and Eyedropper
Procreate’s color wheel lets you select and fine tune colors for your work.
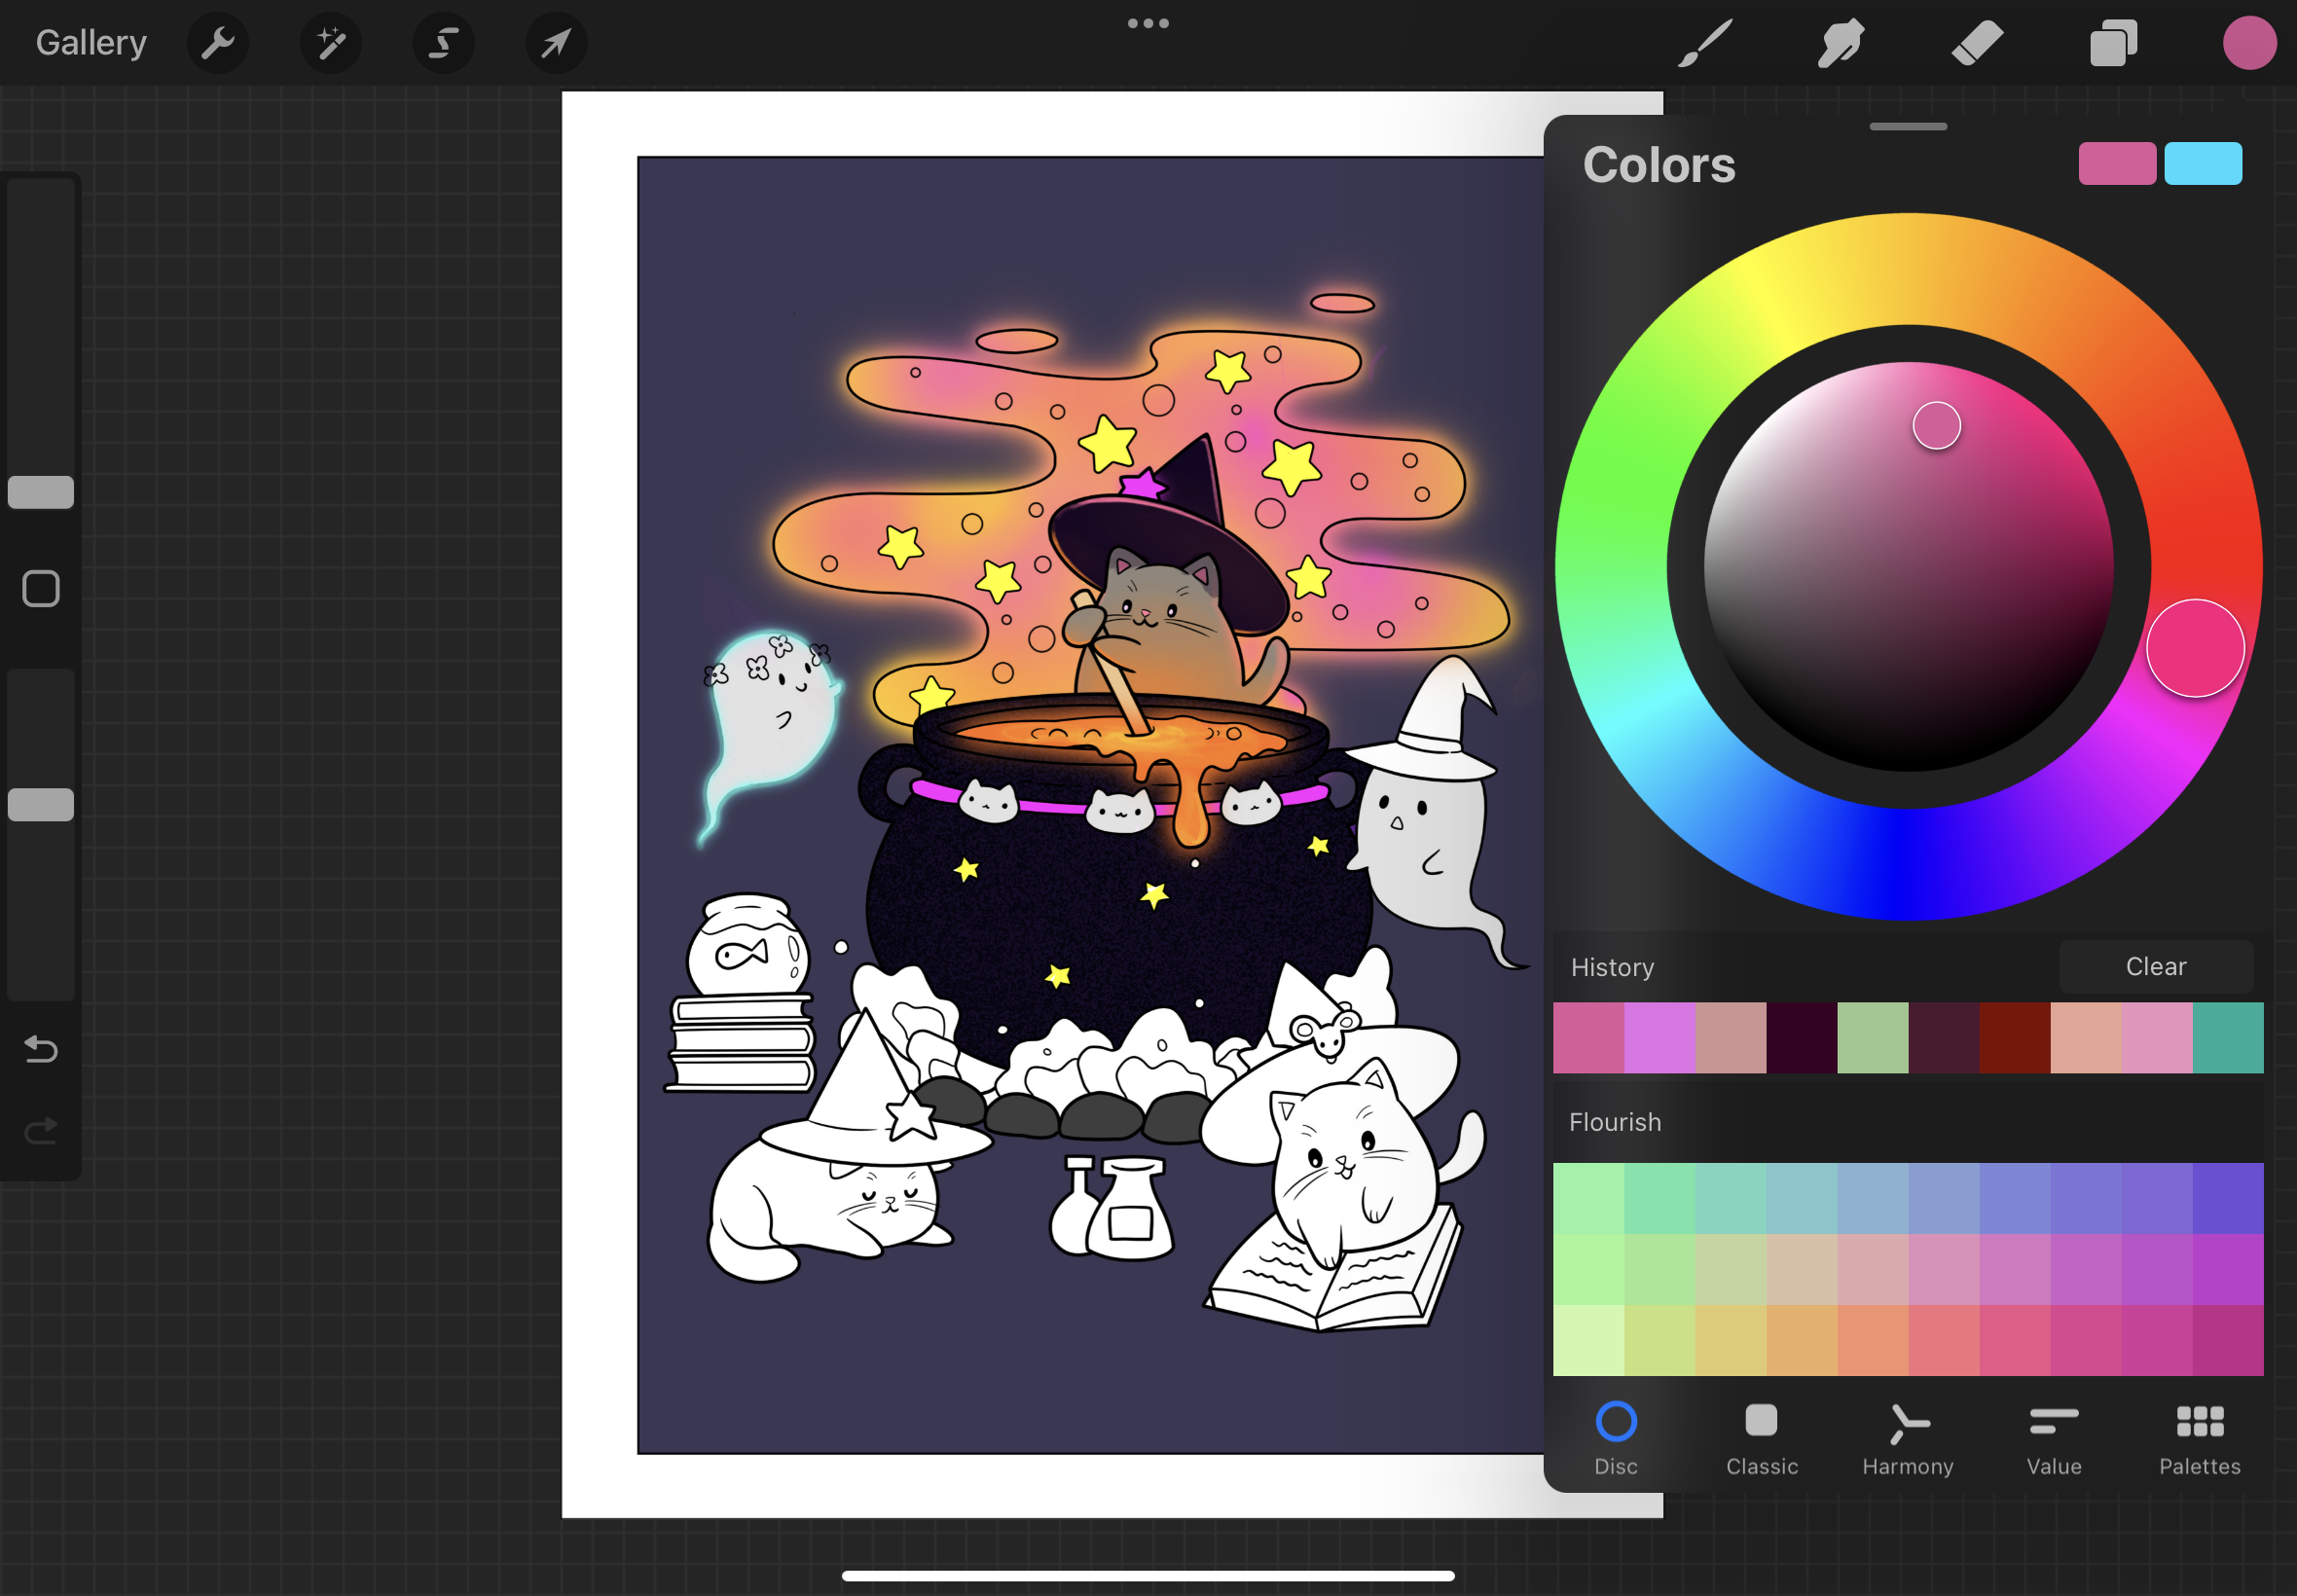 Figure M: Color Wheel
Color Wheel Tabs
- Disc: A circular color wheel to change the hue, saturation, and brightness
- Classic: Basic slides for hue, saturation, and brightness
- Harmony: Finds the complementary color for the current color
- Value: Enter specific HSB, RGB, or Hexadecimal value colors.
Eyedropper
The eyedropper allows you to pick exact colors from your canvas.
- Press and hold your finger on the canvas to sample a color.
 Figure N: Eyedropper example
ColorDrop
ColorDrop works as a fill bucket to fill areas with solid color.
- Drag the color from the color circle onto your canvas to fill the area with that color.
 Figure O: ColorDrop example
Creating and Managing Palettes
Palettes allow you to save and organize colors.
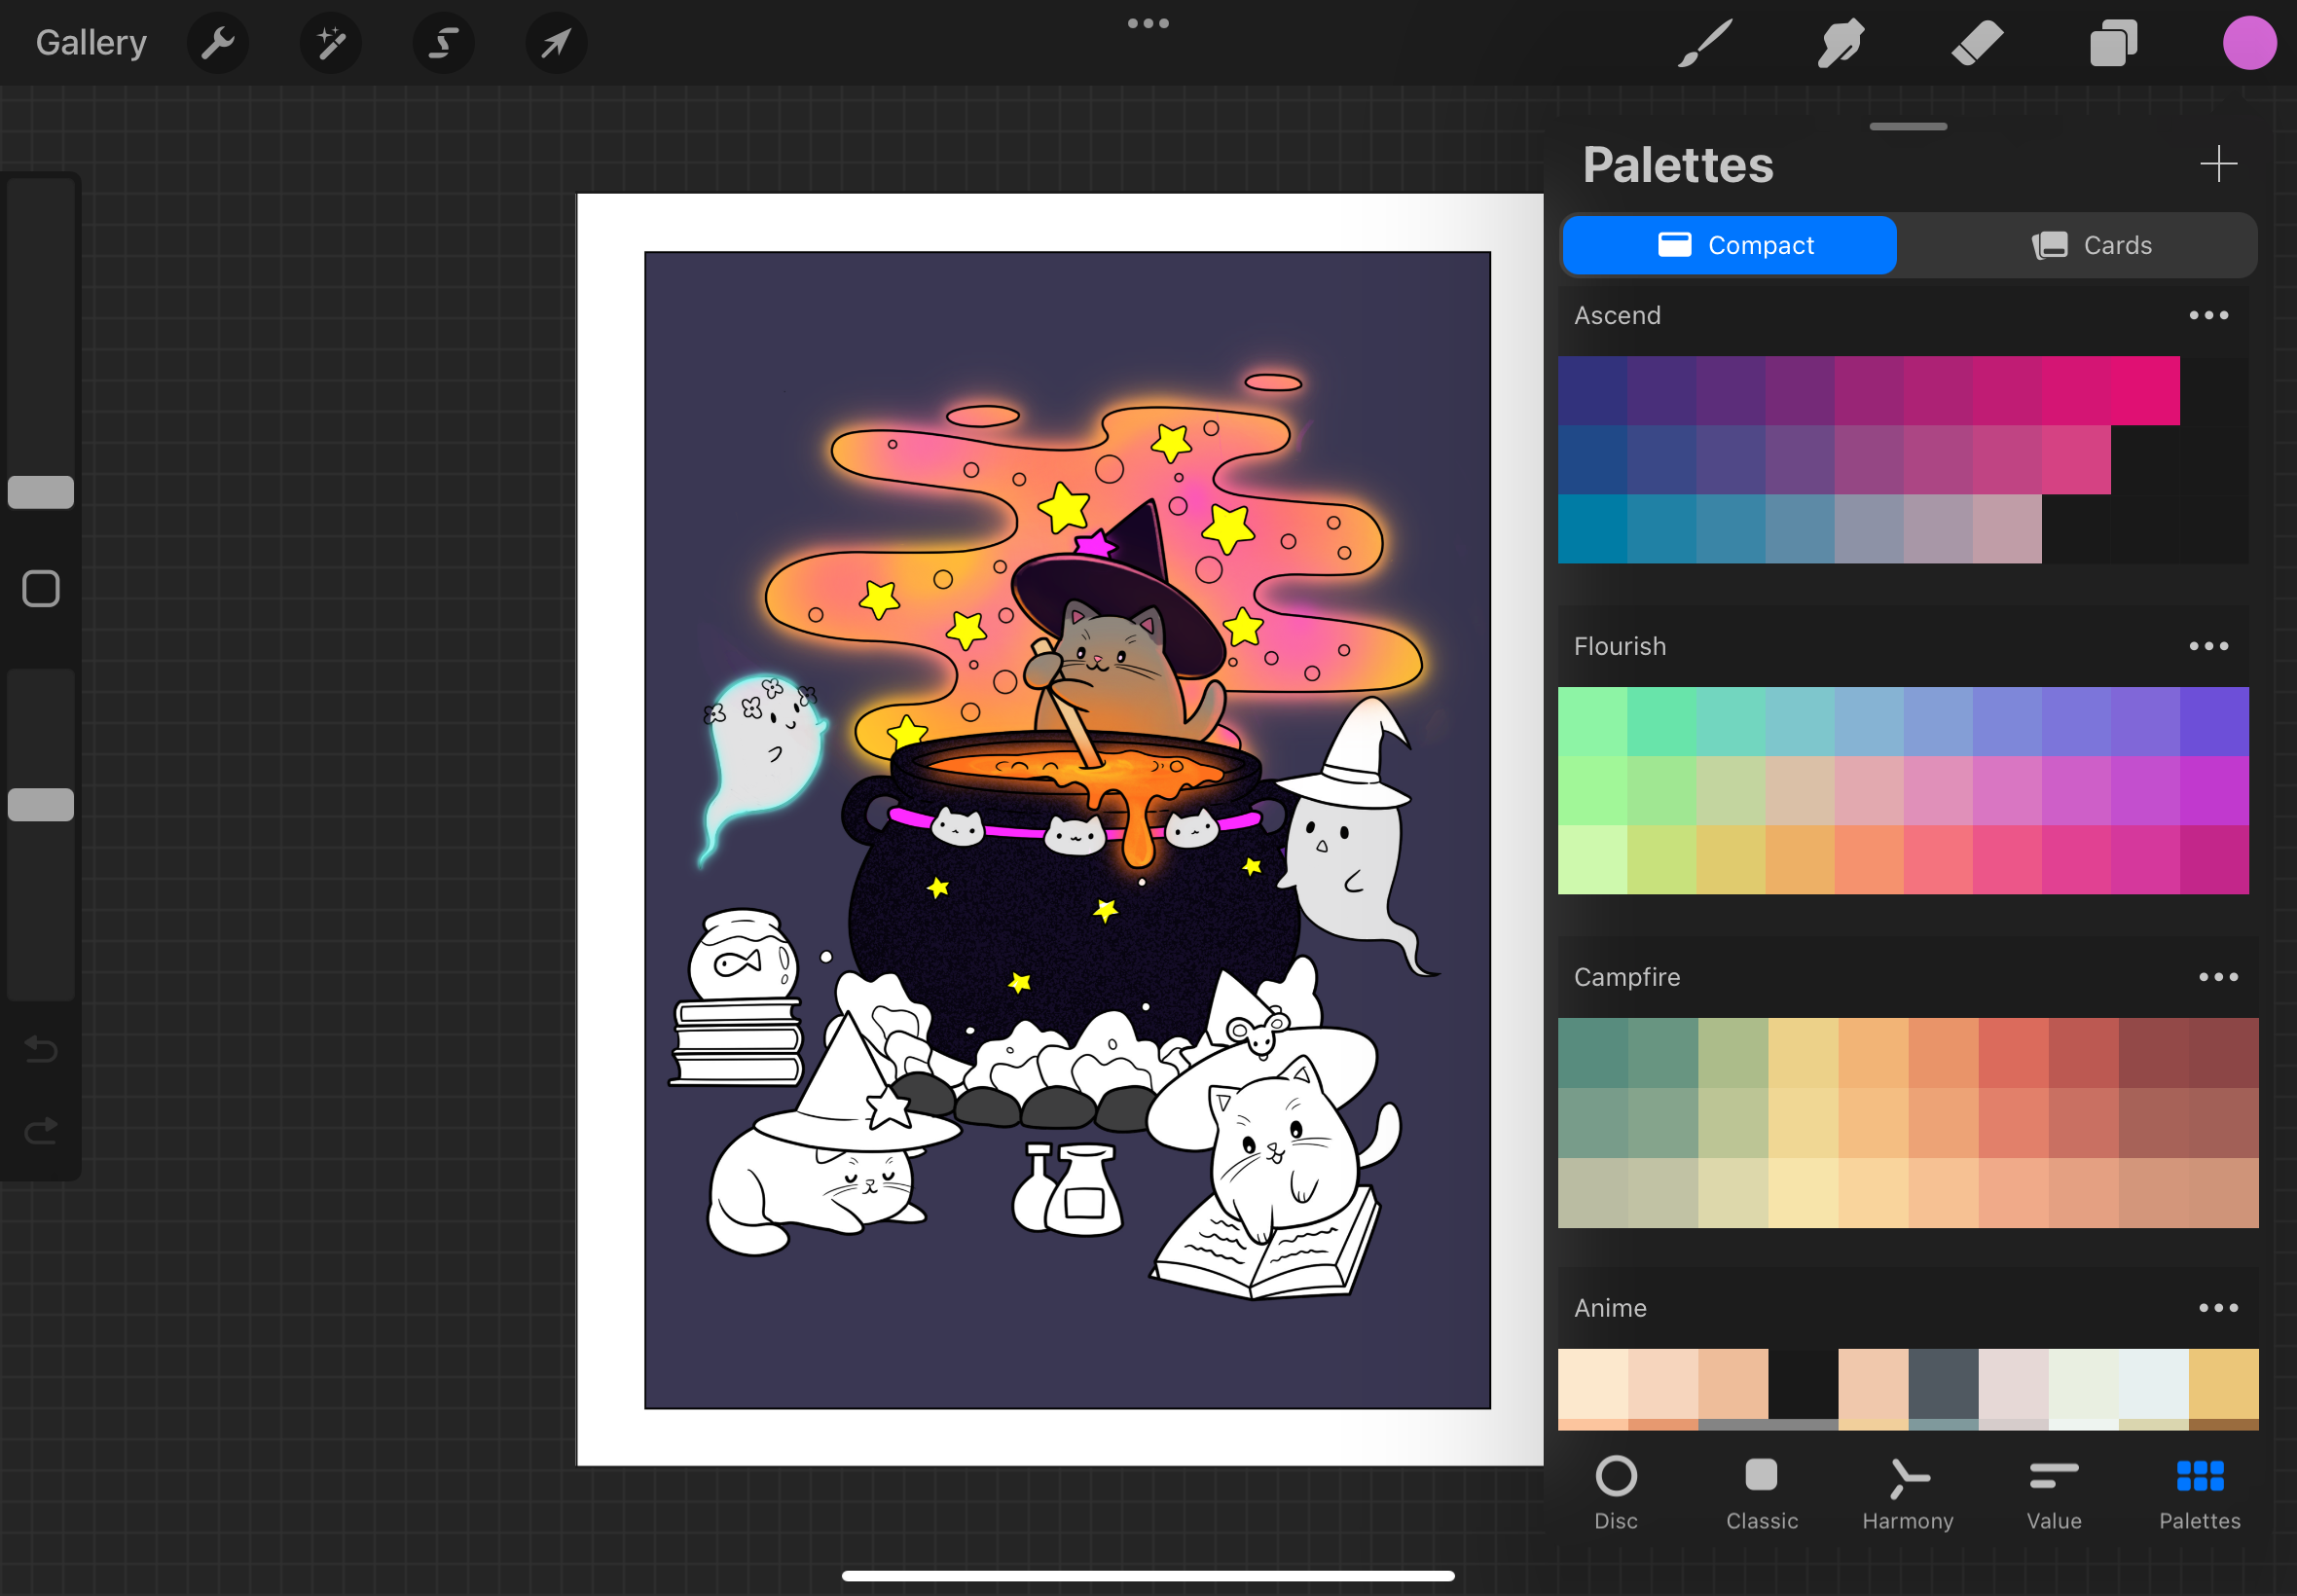 Figure P: Color Palette Menu
Create a palette:
- Open the color wheel and select ‘Palettes’
- Tap the ‘+’ icon at the top-right to create a new palette. Palettes can be created from scratch or from photos and files.
Rename palette:
- Tap the palette name and type the new name.
Reorder Palettes:
- Drag a palette up or down to reorganize the palette menu.
Share or Delete a Palette:
- Tap the elipses at the top-right of the palette
- Select ‘Delete’ to delete the palette. Select ‘Share’ to share the palette.
Transform & Adjustments
Transform Tools
Transform tools allow for manipulation of shapes in your work.
![]() Figure Q: Transform Menu
Figure Q: Transform Menu
- Freeform: Scale shape while changing proportions. Can stretch and compress shapes.
- Uniform: Resize shape while maintaining the proportions.
- Distort: Distort the shape’s structure on a single plane axis.
- Warp: Change the shape’s structure on multiple axises, allowing it to fold on top of itself.
Liquify
Liquify allows you to push, pull and swirl your art to create a “liquified” effect.
To access liquify:
- Open the adjustments menu (the magic wand).
- Select liquify.
Color Adjustments
Color adjustments includes:
- Hue, Saturation, Brightness: Change the HSB values with sliders.
- Color Balance: Adjust color scheme by changing the balance of hues.
- Curves: Advanced modification of colors and balance.
- Gradient Map: Apply gradient across your work. Changes colors based on the highlights, midtones, and shadows and maps them to the gradient map.
Blur
Procreate offers three types of blur adjustments:
- Gaussian Blur: Smooths gradients and soft effect.
- Motion Blur: Simulates movement.
- Perspective Blur: Simulates perspective blur around a point.
Filters and Effects
Procreate pffers six different filters and effects to add to your work:
- Noise: Add grain to your image for a vintage look.
- Sharpen: Enhance details for a crisp image.
- Bloom: Add a glow to your work.
- Glitch: Add various glitch effects.
- Halftone: Creates a halftone print-like look.
- Chromatic Aberration: Creates color halos on the edges of the image to mimic a camera lens.
Selection & Actions
Selection Tools
Procreate’s selection tool allows you to isolate areas of your artwork.
 Figure R: Selection Menu
To use selection, tap the ‘S’-looking icon and choose from:
- Automatic: Automatically selects the area you tap on.
- Freehand: Draw to select complex shapes.
- Rectangle: Select areas in a rectangle.
- Ellipse: Select areas in an ellipse.
Copy, Paste, and Cut
After selecting an area, you can easily copy, paste, or cut selections:
- Copy: Tap the wrench icon to bring up the actions menu, then select ‘Copy’ to duplicate the selection to the clipboard.
- Paste: In the actions menu, select ‘Paste’ to insert the selection in a new layer.
- Cut: Removes the selected area and copies it to the clipboard.
Touch Gestures and Shortcuts
Touch Gestures allow easy access to tools such as rotate and zoom, undo and redo, clearing layers, and more.
Touch to Paint
- Use your finger or Apple Pencil to paint on the canvas.
Pinch to Zoom/Rotate
- Pinch your fingers together to zoom out.
- Pinch your fingers apart to zoom in.
- Pinch and twist your fingers to rotate.
Fit to Screen
- Quickly pinch your fingers together to fit the canvas to the screen.
- Quickly pinch yours fingers apart to go back to the previous view of the canvas.
Tap to Undo
- Two finger tap to undo recent actions.
- To rapidly undo, tap two fingers and hold.
Tap to Redo
- Three finger tap to redo recent actions.
- To rapidly redo, tap three fingers and hold.
Clear Layer
- Move three fingers in a scrubbing motion to clear the current layer.
Fullscreen
- Use four fingers to tap on the canvas to hide the interface. Tap with four fingers to bring the interface back.
Exporting & Sharing Artwork
Export and share your work from the actions menu.
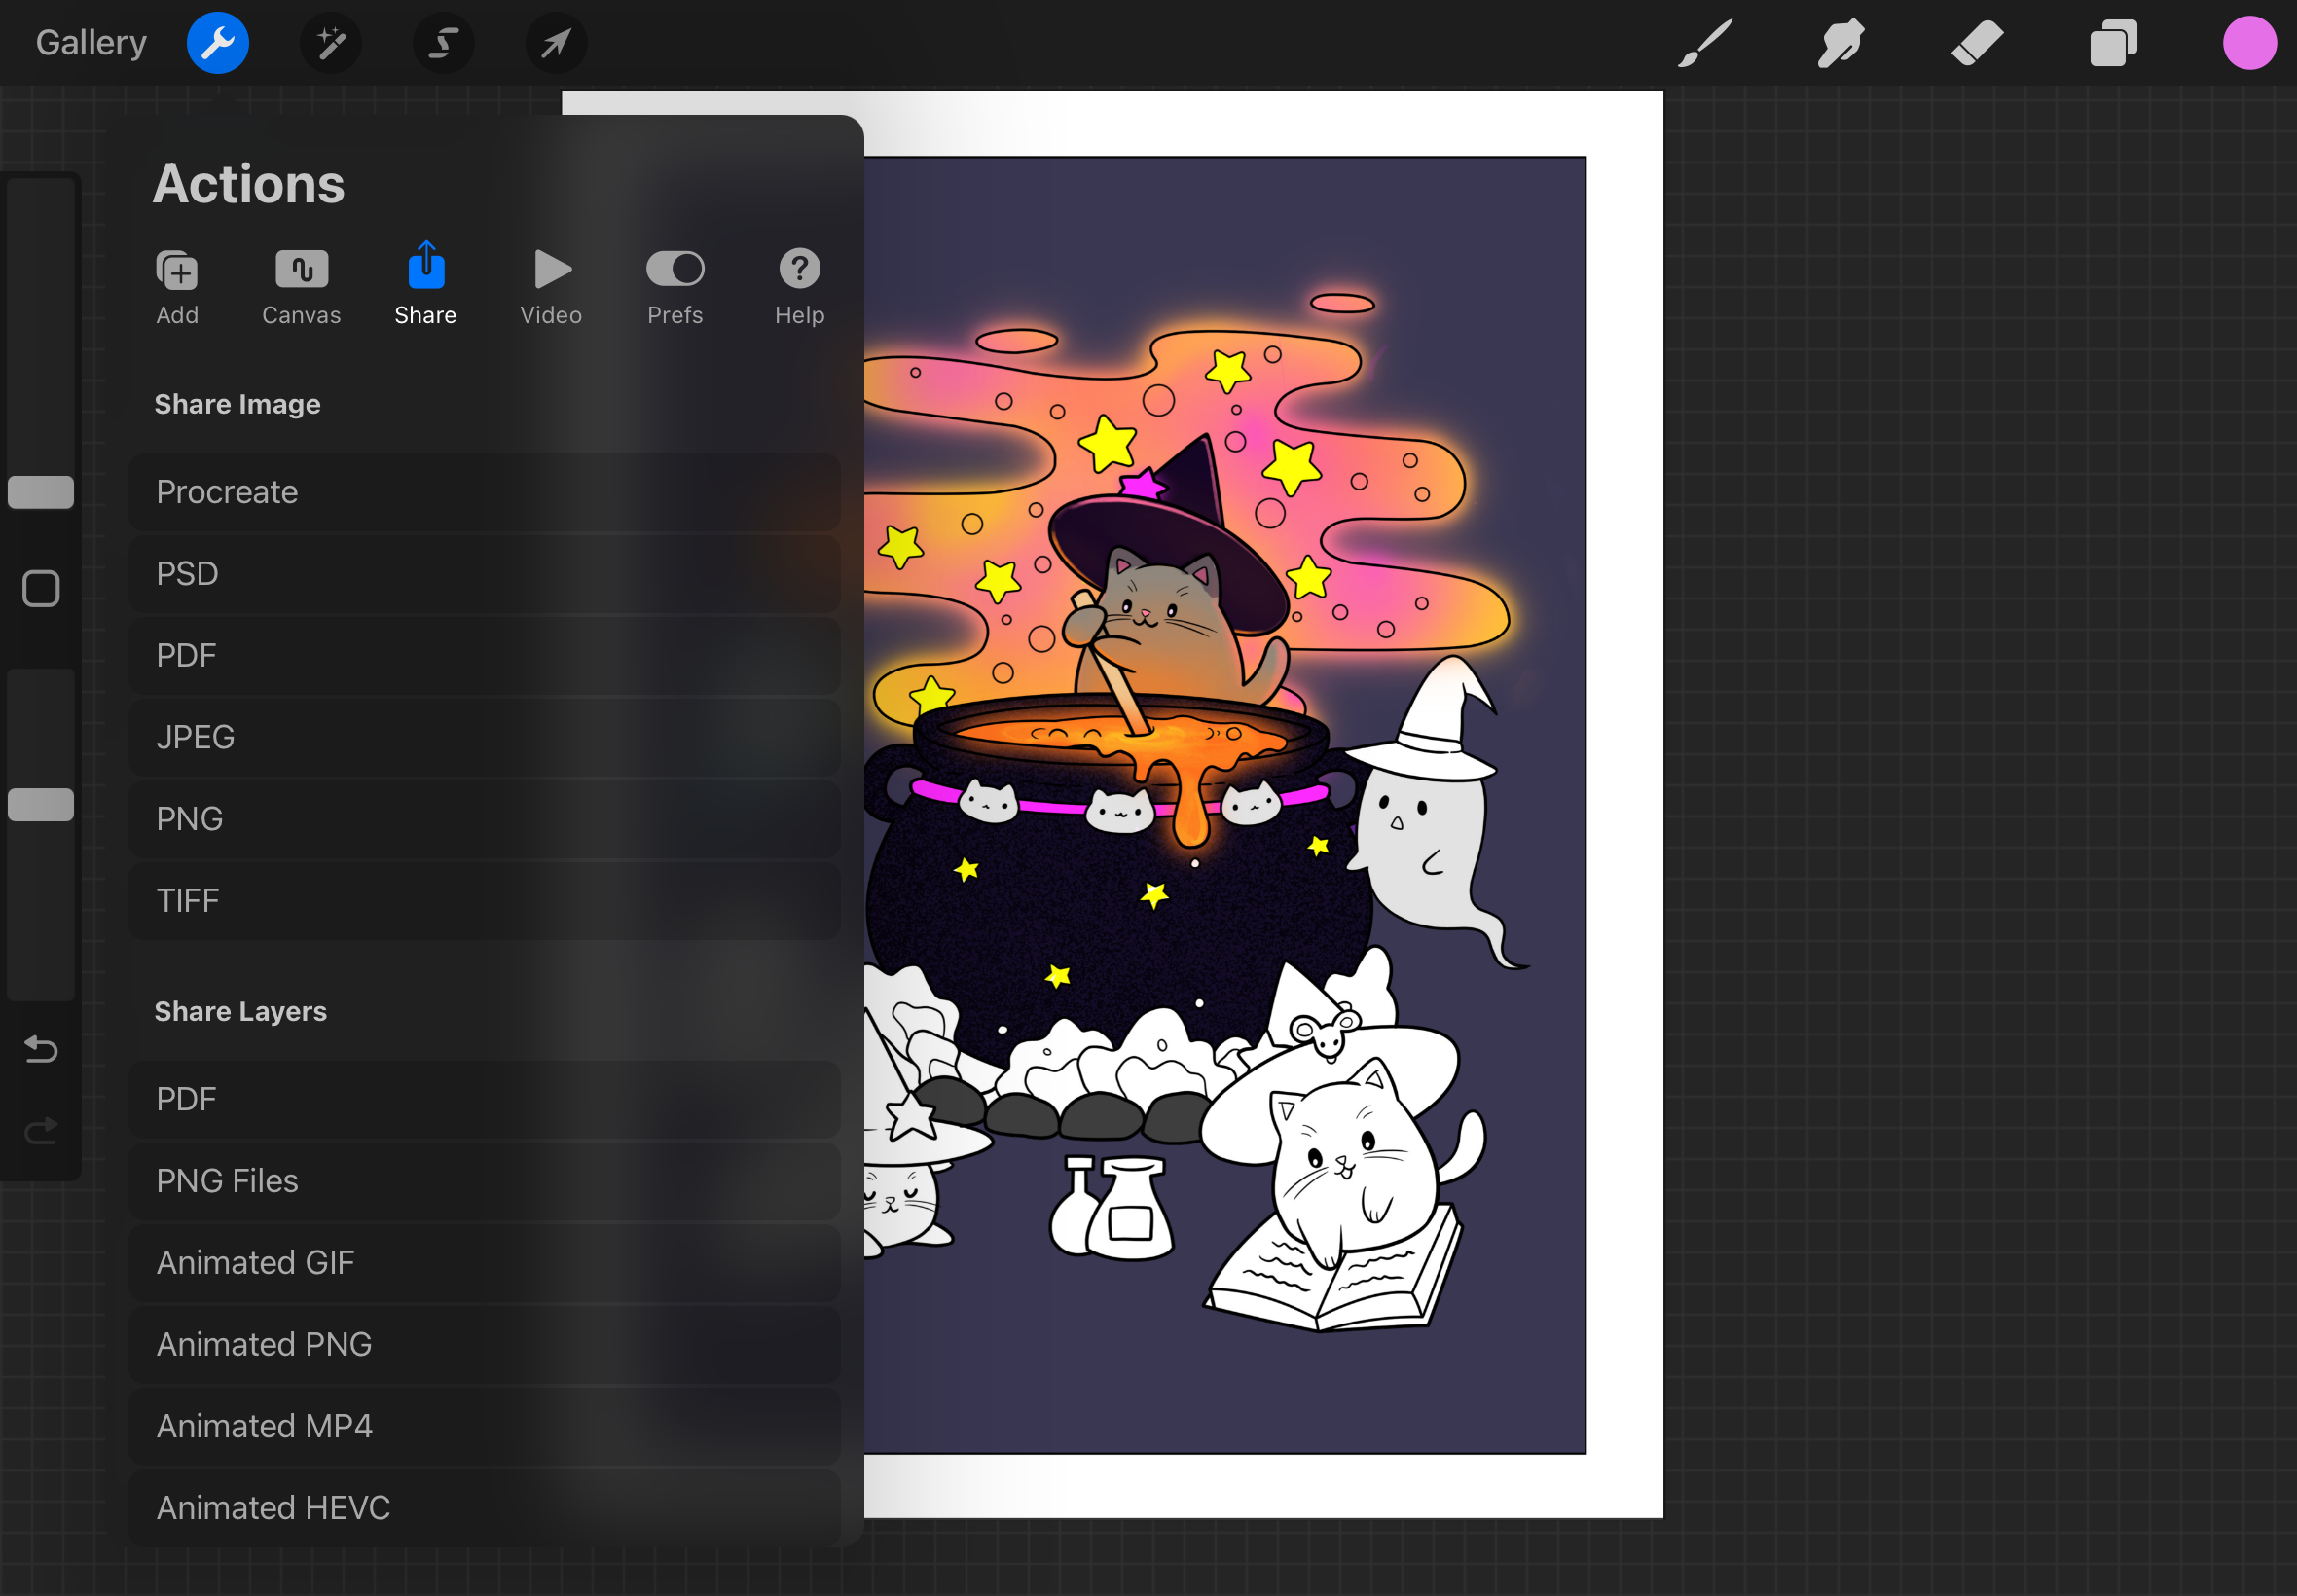 Figure S: Export Options
- Tap the actions menu (the gear icon).
- Select ‘Share’.
- Share image or layers with your preferred file format.
Exporting File Formats
Procreate offers many file formats, each best for a different need:
Share Image
- Procreate: Native format for procreate files. Preserves all layers, masks, adjustments.
- PSD: Native Adobe Photoshop file. Also preserves all layers, masks, and adjustments.
- PDF: Used for print quality and layout preservation. Does not preserve layers.
- JPEG: Exchanges visual quality for a smaller file size. Does not support transparency or layers.
- PNG: Keeps full quality of the image in exchange for a larger file size. Supports transparency. Does not preserve layers.
- TIFF: Full quality export and ideal for printing. Does not perserve layers.
Share Layers
- PDF: Export layers to a PDF with multiple pages.
- PNG Files: Exports layers as separate PNG files into a folder.
- Animated GIF/PNG/MP4/HEVC: Creates a looped animation with each layer being a single frame.
AI Statement
ChatGPT-4.5 was used to create some of the basic outline (headers, subheaders) with the prompt “Provide an outline for a procreate manual”.
References
Procreate Logo from: logos-world.net
All other images and animations created by me with Procreate and Procreate Dreams.